

Okay, so picture this: a swanky holiday party, everyone's buzzing, and then I spot these gorgeous little pear halves, glistening and stuffed with... something. I was intimidated, honestly, thinking 'no way I could make that!' But the host swore they were easy. Fast forward a week, and I decided to tackle them myself. Turns out, these elegant Blue Cheese Pears are surprisingly simple, and now they're a total staple in my kitchen for impressing guests without the stress!
Oh my gosh, I remember one time, I was so excited to bake these Blue Cheese Pears for a dinner party, I totally overstuffed them. The cheese filling was mounded so high! As they baked, it all just kind of melted and oozed right off the pears, creating a cheesy puddle on the baking sheet. They still tasted great, but looked like little cheesy alien pods. Lesson learned: gentle mounds, my friends, gentle mounds!
Ingredients for Your Next Batch of Blue Cheese Pears
- 3 large Bosc or Anjou pears, halved and cored: These are your canvas! I’ve tried other pears, but Bosc and Anjou hold their shape so well when baked and have that perfect firm-but-tender texture. You want them ripe, but not mushy, or they'll just fall apart. A little firmness is key for those beautiful Blue Cheese Pears to stay intact. Plus, their natural sweetness is the perfect counterpoint to the cheese.
- 4 oz crumbled Gorgonzola or Roquefort blue cheese: Okay, this is the star of the show. Gorgonzola is my go-to for its creamy texture and slightly milder funk, but Roquefort brings a bolder, saltier punch if you're feeling adventurous. Don't be shy with the good stuff here, it’s what gives these Blue Cheese Pears their signature flavor. It might seem like a lot, but trust me, it balances out beautifully with the pear and honey.
- 2 oz full-fat cream cheese, softened: This is the unsung hero, honestly. It’s what makes the filling so wonderfully creamy and spreadable, mellowing out the blue cheese just enough so it's not overpowering. Make sure it's softened to room temp, or you'll end up with lumpy filling an 'oops' moment I've had more than once! It binds everything together, giving our Blue Cheese Pears that luscious texture.
- 2 tbsp plain full-fat Greek yogurt: A little secret weapon for extra tang and lightness! The Greek yogurt adds a subtle brightness and keeps the filling from being too heavy. Plus, it gives it a lovely, smooth consistency. I didn't expect that it would make such a difference, but it really elevates the whole mixture. Don't skip it, it's a small touch that has a big impact on the overall flavor.
- 1/4 cup chopped walnuts, lightly toasted: Crunch, crunch, crunch! These toasted walnuts add such a fantastic textural contrast to the soft pears and creamy cheese. The toasting step is non-negotiable, hon it brings out their nutty flavor, making them irresistible. I've forgotten to toast them before, and they just don't hit the same. That earthy crunch is essential for balancing the sweetness and creaminess.
- 2 tbsp local honey: Oh, the drizzle! Local honey is my favorite because it just feels right, supporting local beekeepers and adding that touch of floral sweetness. It caramelizes slightly during baking and then a final drizzle just ties all the flavors together. It’s the perfect sweet kiss for those savory Blue Cheese Pears, making them utterly divine. Don't be afraid to be generous with it!
Crafting Delicious Blue Cheese Pears: A Step-by-Step Guide
- Step 1: Prep Pears & Preheat:
- Alright, let's get those pears ready! Preheat your oven to 375°F (190°C) and line a baking sheet with parchment paper a lifesaver for easy cleanup, trust me. Grab your Bosc or Anjou beauties, halve them lengthwise, and scoop out the core. A melon baller works wonders here! A quick brush of lemon juice keeps them from browning. This is the foundation for our elegant Blue Cheese Pears, so take your time and make them pretty.
- Step 2: Create Cheese Filling:
- Now for the good stuff! In a medium bowl, combine your crumbled blue cheese, softened cream cheese, Greek yogurt, a pinch of salt, and black pepper. Get in there with a fork or a spoon and mix it until it’s super smooth and creamy. Taste it! Adjust the salt if needed. This is where the magic for the Blue Cheese Pears really starts to come alive, a symphony of flavors in the making. It should be rich and tangy, just perfect.
- Step 3: Toast Walnuts:
- Don't skip this! Spread your chopped walnuts on a small, dry skillet over medium heat. Keep an eye on them, stirring occasionally, until they're fragrant and lightly golden, usually just 3-5 minutes. The smell is amazing! Once they're done, take them off the heat immediately and let them cool a bit. That toasty crunch is essential for the texture of our Blue Cheese Pears, adding depth you just can't get otherwise.
- Step 4: Stuff Pear Halves:
- Time to stuff! Spoon that glorious cheese filling into the hollowed-out pear halves. You want a generous mound, but don't go crazy like I did that one time (oops!). Leave a little pear visible around the edges. This step is where your Blue Cheese Pears start to look like the fancy appetizer they are. Gently press a few toasted walnuts into the top of each cheese mound. They're already looking so inviting, aren't they?
- Step 5: Bake Pears:
- Carefully arrange your stuffed pear halves on the prepared baking sheet. Pop them into your preheated oven and bake for about 15-20 minutes. You're looking for the pears to be tender when pierced with a fork, and the cheese filling should be warm and slightly bubbly, with a hint of golden on top. The aroma filling your kitchen right now? That's the unmistakable scent of delicious Blue Cheese Pears baking, it's heavenly!
- Step 6: Garnish & Drizzle:
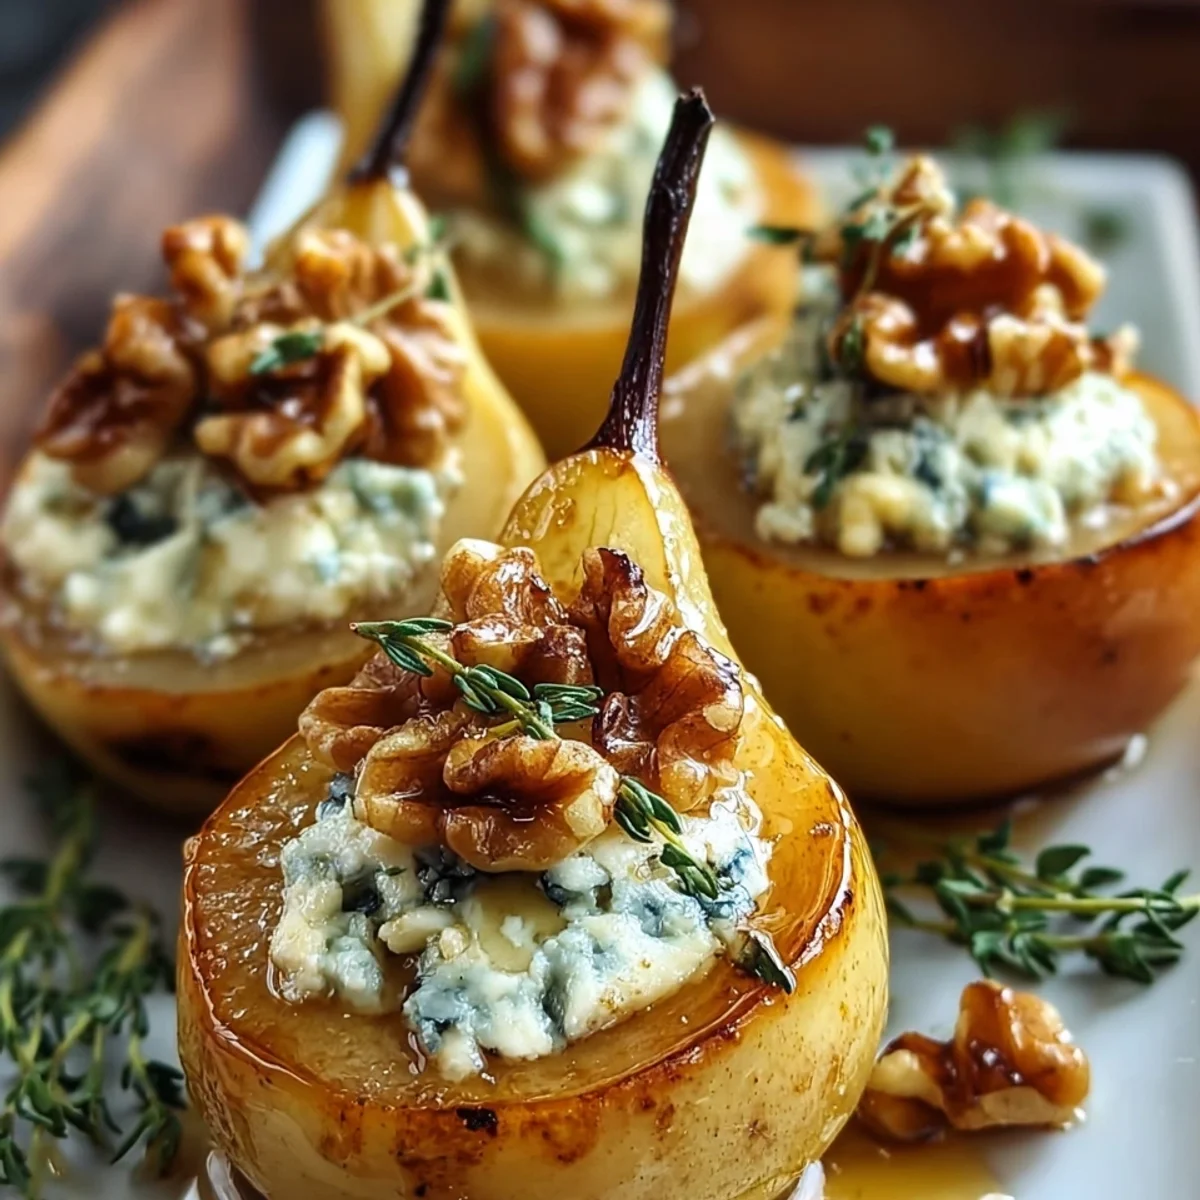
- Once they're out of the oven, let those beautiful Blue Cheese Pears cool for a couple of minutes. This lets the filling set just a tiny bit. Now for the final flourish: a generous drizzle of local honey over each pear. Sprinkle with the remaining toasted walnuts and those vibrant fresh thyme leaves. The fresh thyme really brightens everything up. Serve them warm and watch them disappear!
Making these Blue Cheese Pears is honestly one of my favorite kitchen rituals. The smell of the pears softening, the cheese melting, and the honey caramelizing it's just pure comfort. There's a real joy in seeing something so simple transform into such an elegant dish, and then sharing that with friends. It feels like a little bit of gourmet magic, without all the fuss.
Keeping Your Blue Cheese Pears Fresh: Storage Secrets
Okay, so you've got leftover Blue Cheese Pears what a problem to have, right? If you manage to have any, store them in an airtight container in the fridge for up to 2-3 days. Reheating them can be a bit tricky, honestly. I've tried microwaving them, and they get a bit sad and watery, which is an 'oops' moment I don't recommend. The best way is to gently warm them in the oven at 300°F (150°C) for about 10-15 minutes until just heated through. They won't be quite as firm as fresh, but still tasty! Or, to be real, they're pretty good chilled too, especially if you let them come to room temperature first.

Swapping Ingredients for Your Blue Cheese Pears
I've experimented with so many versions of these Blue Cheese Pears! If Gorgonzola or Roquefort isn't your jam, a milder blue like Danish blue or even a creamy goat cheese could work, though the flavor profile will change quite a bit. I once tried a sharp cheddar, and let's just say it wasn't the same elegant vibe. For walnuts, pecans or even pistachios would be amazing for a different crunch. No thyme? Fresh rosemary or even a sprinkle of dried sage can add a nice earthy note. As for honey, maple syrup could be a fun, darker alternative. Don't be afraid to play around, but I always come back to the original for that perfect balance.
How to Serve Blue Cheese Pears Like a Pro
Oh, how do I love to serve these Blue Cheese Pears? Let me count the ways! They're absolutely divine warm, fresh out of the oven, as a standalone appetizer. But don't stop there! I often serve them on a beautiful platter with extra toasted walnuts, a little bowl of honey for drizzling, and maybe some crispy baguette slices or artisanal crackers on the side. They pair beautifully with a crisp, dry white wine like a Sauvignon Blanc or a light-bodied Pinot Noir. For a brunch spread, they're a showstopper. And honestly, they make a fantastic addition to any cheese board, adding that warm, sweet, and savory element that just elevates everything. These Blue Cheese Pears are so versatile!
The Sweet & Savory Story Behind Blue Cheese Pears
The concept of pairing fruit with cheese isn't new, of course it’s a classic for a reason! Think about how often you see apples or grapes on a cheese board. But elevating that simple pairing into something baked and warm, like these Blue Cheese Pears, feels a bit more modern. The sweet-savory combination has roots in many culinary traditions, from medieval European dishes combining fruit and meat, to Middle Eastern tagines with dried fruits. For me, discovering this recipe was about taking those comforting, familiar flavors and presenting them in a fresh, exciting way that feels both timeless and totally now. It's about bringing that old-world elegance into my modern kitchen, with a personal twist.
So there you have it, my friends the secret to making these show-stopping Blue Cheese Pears. They’re proof that 'elegant' doesn't have to mean 'complicated.' I hope you give them a try and fall in love with them just as much as I have. Don't forget to tag me in your kitchen adventures! I can't wait to see your beautiful creations and hear about your own 'oops' moments. Happy cooking, everyone!

Your Burning Questions About Blue Cheese Pears Answered
- Can I make these Blue Cheese Pears ahead of time?
You can prep the pears and make the cheese filling a day ahead. Store them separately in the fridge. Then, just stuff and bake when you're ready to serve! It saves so much time on party day, honestly. I do it all the time for entertaining, makes life so much easier.
- What if I don't like blue cheese?
No worries! While the blue cheese is key to these Blue Cheese Pears, you could swap it for a creamy goat cheese (chevre) or even a sharp, aged white cheddar. The flavor profile will be different, but still delicious! Just make sure it's a cheese that melts nicely and pairs well with fruit.
- What kind of pears work best for this recipe?
Bosc or Anjou pears are my top picks because they hold their shape beautifully when baked and have a lovely firm-yet-tender texture. Avoid super ripe, soft pears, as they might turn mushy. You want them ripe enough to be sweet, but still firm to the touch.
- How do I know when the pears are done baking?
The pears are ready when they're tender enough to be easily pierced with a fork, but still hold their shape. The cheese filling should be warm, slightly bubbly, and perhaps a little golden around the edges. Usually, 15-20 minutes is the sweet spot in my oven.
- Can I make these more savory or sweeter?
Absolutely! For a more savory take, reduce the honey drizzle and maybe add a pinch of chili flakes to the cheese filling. For sweeter, be more generous with the honey, or even add a sprinkle of brown sugar before baking. It's your kitchen, play around!