

Hey, sweet friends! Today, we're diving into a breakfast staple that holds a special place in my heart: Classic french toast. I first stumbled upon a recipe for this beauty in a tattered old cookbook my grandma gave me. I mean, who knew a few simple ingredients could transform into something so comforting and delicious? It was love at first bite, and honestly, it's been a weekend ritual ever since!
Oh, the early days! I remember one Saturday morning, totally hyped to make my French toast. I grabbed what I thought was cinnamon, sprinkled it generously, and started cooking. The smell was… off. Turns out, I'd used chili powder! My husband took one bite, looked at me with wide eyes, and we both burst out laughing. spicy French toast? Not exactly a winner, but hey, it was memorable!
The Secret Ingredients for Perfect Classic French Toast
- 8 slices (1-inch thick) Brioche or Challah bread: This, my friends, is the non-negotiable star of our Classic French Toast show! Using a rich, slightly sweet bread like brioche or challah makes all the difference. It's like building your dream house on the best foundation. The thick slices soak up that custardy goodness without falling apart, giving you that perfect fluffy-yet-crispy texture. Honestly, don't skimp here, it's what makes it feel extra special.
- 4 large Eggs: Eggs are the binding magic, the heart of our custard. They bring that beautiful richness and help create that signature custardy interior we all crave in Classic French Toast. I've tried using fewer eggs to be 'healthier,' and oops, it just doesn't work. You end up with soggy bread, not that glorious, eggy goodness. So, trust me, stick to the four, they're pulling their weight!
- 1 cup Whole Milk: Whole milk is key for a creamy, dreamy batter. I've experimented with skim milk, almond milk, even oat milk, and while they work in a pinch, whole milk just gives you that luscious, rich consistency. It helps the bread absorb the flavors evenly and contributes to that beautiful, moist texture. It's the liquid hug for our bread, you know? Don't be afraid of a little fat for flavor!
- 2 tbsp Granulated sugar: Just a touch of sugar in the batter is all you need to elevate the flavors without making it overly sweet. This isn't about making a dessert, it's about enhancing the natural sweetness of the brioche and balancing out the spices. It helps with that gorgeous golden-brown caramelization on the griddle too. Think of it as a little secret handshake between the bread and the heat.
- 1 tsp Pure Vanilla Extract: Oh, vanilla! It's like a warm, comforting hug in liquid form. This isn't just a flavor, it's an aroma that tells your brain, 'something delicious is happening!' Don't even think about skipping this. It adds such a beautiful depth and warmth, perfectly complementing the cinnamon and nutmeg. It's a small step, but it makes a huge impact on the overall taste experience of your Classic French Toast.
- 1/2 tsp Ground Cinnamon & 1/4 tsp Ground Nutmeg: These two spices are the dynamic duo that screams 'cozy breakfast!' Cinnamon brings that sweet, warm spice, while nutmeg adds a subtle, earthy depth. Together, they create that iconic, irresistible aroma and flavor profile that makes Classic French Toast so comforting. I always keep fresh spices on hand because, honestly, old spices just don't pack the same punch, and you want that punch!
Mastering Classic French Toast: A Step-by-Step Guide
- Step 1: Prepare Custard Batter:
- Alright, let's get this party started! In a shallow dish I usually use a pie plate, it's perfect for dipping whisk together your eggs, whole milk, granulated sugar, vanilla extract, cinnamon, nutmeg, and a tiny pinch of salt. Whisk it until everything is beautifully combined and the sugar has dissolved. You want a smooth, golden, fragrant bath for your bread. This is the foundation of our amazing Classic French Toast, so take a moment to really get it well-mixed and uniform. You can even take a little sniff, it already smells incredible!
- Step 2: Preheat Griddle, Melt Butter:
- Next up, heat your griddle or a large non-stick skillet over medium heat. You're looking for that sweet spot where it's hot enough to sizzle but not so hot it'll burn. Melt about half of your unsalted butter, letting it coat the surface. The butter is crucial for that rich flavor and helps achieve that gorgeous golden-brown crust. I always keep an eye on it, making sure it's shimmering but not smoking. This is where the magic begins for our Classic French Toast!
- Step 3: Dip Bread Slices:
- Now for the fun part! Take each slice of your beautiful brioche or challah and gently submerge it in the custard batter. Don't let it sit too long, just about 15-20 seconds per side. You want it to soak up that eggy goodness, but not become a soggy mess. Too long, and it'll fall apart, too short, and you won't get that custardy center. It's all about that perfect balance for the best Classic French Toast experience.
- Step 4: Cook Golden Brown:
- Carefully transfer your dipped bread slices to the preheated griddle. Don't overcrowd the pan, give them some space to breathe and brown evenly. Let them cook for about 3-4 minutes per side, until they're a beautiful, inviting golden-brown and cooked through. You'll see those edges crisping up and the center puffing slightly. This is where the aroma really takes over your kitchen, signaling that your Classic French Toast is almost ready!
- Step 5: Serve Warm:
- As each batch finishes, transfer your perfectly cooked Classic French Toast to a plate. If you're making a larger batch, you can keep the finished slices warm in a low oven (around 200°F/90°C) while you finish the rest. Honestly, there's nothing better than digging into a stack of warm French toast, fresh off the griddle. The warmth really brings out all those beautiful flavors and textures.
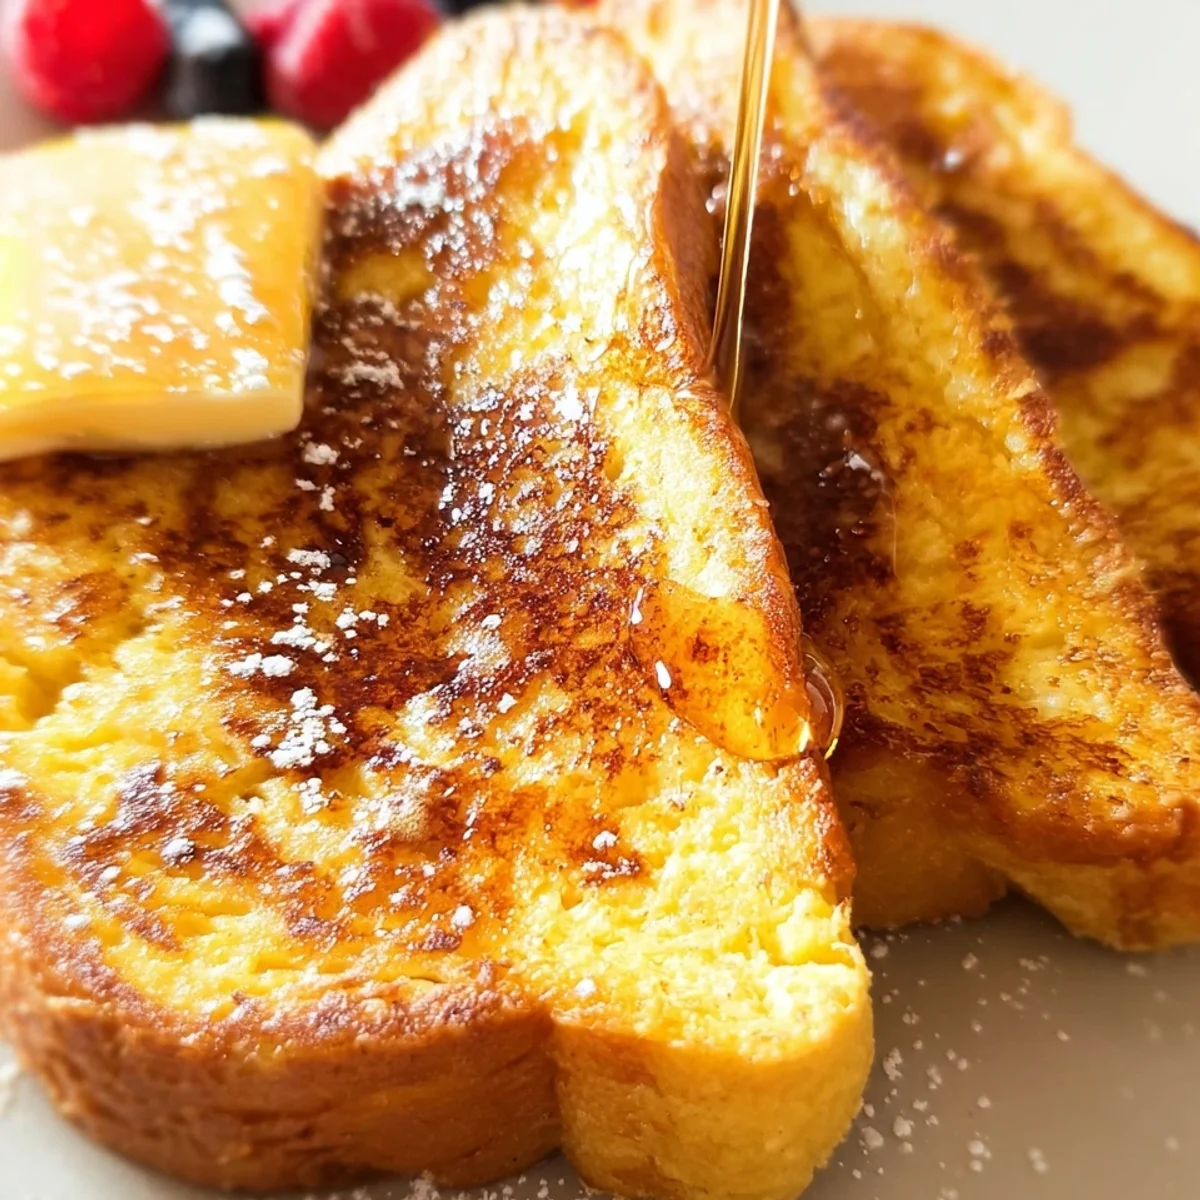
- Step 6: Garnish and Enjoy:
- This is where you get to personalize your masterpiece! Stack those golden beauties high and drizzle generously with pure maple syrup. A dusting of powdered sugar adds a touch of elegance, and fresh berries or sliced bananas bring a pop of color and freshness. Don't forget a little extra butter if you're feeling decadent. Sit back, take a deep breath, and savor every single bite of your homemade Classic French Toast. Pure breakfast heaven!
Making Classic French Toast is one of my favorite kitchen meditations. There's something so calming about whisking the batter, dipping the bread, and watching it transform on the griddle. The sizzle, the smell of cinnamon and vanilla it just fills my kitchen with joy. It's a simple pleasure, really, but one that brings so much comfort and a delicious start to any day. Every time I make it, I feel that warmth.
Keeping Your Classic French Toast Fresh: Storage Hacks
So, you've made a big batch of Classic French Toast and have leftovers? Lucky you! Let them cool completely first, trying to store warm toast leads to condensation and sogginess, and nobody wants that. Once cool, stack them with parchment paper in between each slice to prevent sticking, then place them in an airtight container or a freezer-safe bag. They'll keep in the fridge for 2-3 days. For longer storage, freeze them for up to a month. To reheat, I love popping them in the toaster or a toaster oven for a few minutes until warmed through and slightly crispy again. Microwaves work, but you lose that lovely texture, which is a big oops for me!

Creative Twists on Classic French Toast: Ingredient Swaps
I've played around with so many variations of Classic French Toast, and honestly, it's hard to go wrong! If brioche or challah aren't available, a good quality sourdough or even Texas toast can work, just adjust your soaking time. For the milk, a splash of heavy cream mixed with regular milk makes it extra rich yum! If you're out of vanilla, a tiny dash of almond extract can give a different but equally lovely aroma. And spices? Cardamom instead of nutmeg is a fun twist, or a pinch of pumpkin pie spice for a seasonal flair. Don't be afraid to get creative, but stick to the basics for your first go!
Elevating Your Classic French Toast: Serving Ideas
beyond the classic maple syrup and powdered sugar, oh honey, the possibilities for Classic French Toast are endless! My go-to is always fresh berries raspberries, blueberries, strawberries they add a lovely tartness. A dollop of whipped cream or even a scoop of vanilla ice cream makes it feel extra decadent. For something savory-sweet, a side of crispy bacon or sausage is a must. Sometimes I'll make a quick berry compote or caramelized bananas. And for a truly French touch, a side of strong coffee or a mimosa just makes the whole experience sing. Make it a brunch spread!
The Sweet History Behind Classic French Toast
You might think the name 'French toast' means it's from France, right? Well, not exactly! While similar dishes have been around for centuries, often as a way to use up stale bread, the earliest known recipe actually dates back to ancient Rome! The term 'French toast' itself reportedly comes from an American named Joseph French, who forgot the apostrophe when advertising his dish in 1725. In France, they call it 'pain perdu' (lost bread), which I love it's bread that's been 'lost' to staleness, then 'found' again through delicious transformation. It's a beautiful story for such a humble, yet glorious, dish like our Classic French Toast.
And there you have it, my friends! Your very own batch of glorious Classic French Toast. It's more than just breakfast, it's a hug on a plate, a sweet start to any day. I hope you love making and eating this as much as I do. It's truly a recipe that brings joy. So, whip up a batch this weekend and tell me, what are your favorite toppings? Share your Classic French Toast moments with me!

Burning Questions About Classic French Toast, Answered!
- Can I make the batter ahead of time?
You totally can! Whisk the custard together, cover it, and pop it in the fridge for up to 24 hours. Just give it a good whisk again before dipping your bread, as the spices might settle. It's a great time-saver for busy mornings!
- What if I don't have brioche or challah?
No worries! While those are my top picks, a good quality white bread, sourdough, or even Texas toast works well. Just make sure it's thick-cut and preferably a day or two old so it holds up to the soaking without getting mushy.
- How do I know when the French toast is cooked through?
Look for a beautiful golden-brown color on both sides. The center should feel slightly firm when gently pressed, not squishy. If it's browning too fast, your heat might be too high. Trust your senses!
- Can I make this dairy-free?
Yes, you can! Substitute the whole milk with a rich plant-based milk like full-fat oat milk or cashew milk. Use a dairy-free butter alternative for cooking. The flavor will be slightly different, but still delicious and a good option!
- Why is my French toast soggy?
Likely culprits are fresh bread (it needs to be slightly stale!), soaking the bread for too long, or your griddle not being hot enough. Make sure to use thick-cut, slightly dry bread, a quick dip, and a medium-hot pan for that perfect custardy but not soggy texture.